Before Continuing: Serial COM Port Analyzer
This project is on GitHub: link
table of contents
Summary of the Application
In this project, the goal was to process and analyze digital signals, and we have taken a small step in signal processing. Now, it is time to analyze the signals to determine if we are achieving meaningful results.
I highly recommend using a cost-effective logic analyzer instead of creating your own desktop application. However, in the course of this project, I developed a small application capable of receiving data packets from both UART and USB, equipped with various settings.
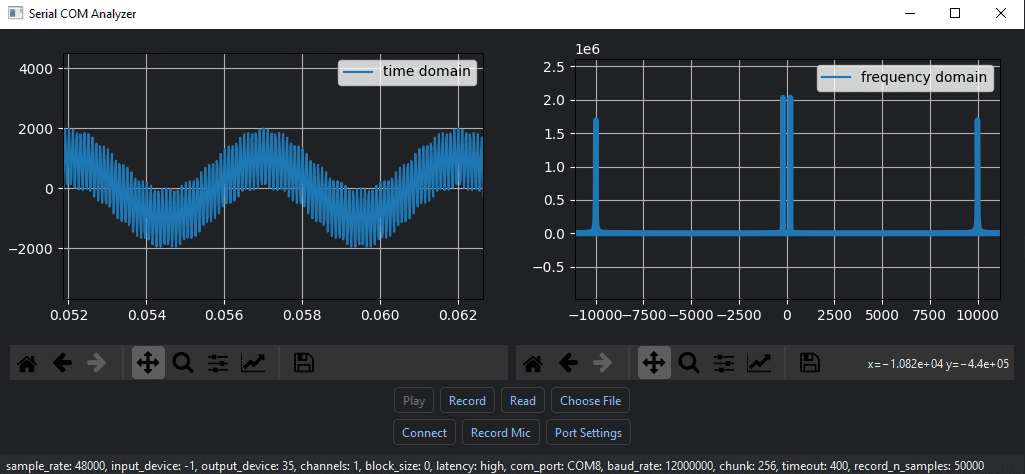
As seen in the figure, the left window displays the received packages in the time domain, while the right window shows the frequency domain. I acknowledge that some of the buttons are not well-organized and may appear outdated today. Initially, the intention was to receive only UART packages, but as the project expanded, so did the requirements.
The project was implemented in Python using external libraries Pyqt6, sounddevice, and numpy. The plots for the received data may seem familiar, as they originate from matplotlib. There is a recommended approach on how to use the matplotlib backend with Pyqt, detailed in [1].
This application is designed to be multi-threaded due to GUI freezing and packet losses. Further details are left for the reader to explore as they delve deeper into this project series.
In short, the app consists of:
-
GUI thread, responsible for controlling button actions, updating both plots, and opening/closing communication protocols.
-
SerialDataFetcher thread, that is catching and processing UART packages
-
MicRecorder thread, dedicated to receiving USB packets (the development board was connected as a MIC to Windows, hence the name).
-
AudioPlayer thread, continuously streaming the fetched packages directly to the speaker or the designated Virtual Cable.
See some signals the threads use:
class FetcherSignals(QObject):
    """
    These signals are used with threads of this program to communicate through the lifecycle
    contains 'result' and 'finish' signals of the DataFetcher
    result_signal: send data to matplotlib to plot the data
    finish_signal: pause or terminate the thread
    """
    result_signal = pyqtSignal(object)
    finish_signal = pyqtSignal()

    def __init__(self):
        super().__init__()
How to use?
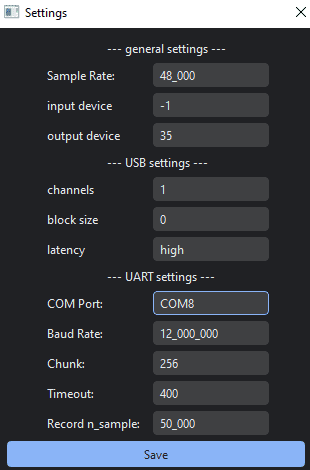
For UART, open Port Settings and provide the required parameters. After that, try to open the port using the Connect button. You should then see the signals if everything is set up correctly. The Record button captures data packets, but you need to press the Connect button again to stop listening. It won’t plot anything during recording to avoid losing any packets. The recorded packages can be selected using the Choose File option and read using the Read button. Read files can also be played through the speakers. Keep in mind that some tweaks may be necessary, as I am not actively developing the UART part.
On the other hand, the USB part is much simpler. Open Port Settings, provide your parameters, and click Record Mic. That’s it. It should stream to the output device, a parameter that you can set to a virtual cable. Also, don’t forget to specify the correct sample rate, as this value is utilized during FFT calculations in the background. If you stop the stream by pressing the Connect button again, you may need to re-open the application. The development board goes into idle state and needs to be reawakened.
Next Projects
Next projects will be using this analyzer from now on. Let’s continue!
[1] The Matplotlib development team, “Embedding in Qt,” Embedding in Qt - Matplotlib 3.8.2 documentation, https://matplotlib.org/stable/gallery/user_interfaces/embedding_in_qt_sgskip.html (accessed Jan. 3, 2024).